
Hello there Misfitian’s! Welcome to another episode of How to Watercolor where I teach you tricks, tips, and tutorials on how to use Watercolor. On this week’s episode, I’m going to be teaching you how to paint autumn watercolor leaves. However, I’m not sure if you’ve noticed…but there are ALOT of autumn watercolor leaves tutorial on YouTube. Like ALOT! I’m almost starting to wonder if it’s this mandatory rule of – thou must teach autumn leaves in Autumn. Well, I’m gonna teach it – but being the misfit that I am – let’s put a little spin on this tutorial and make it unlike any other.
But before we begin you are going to need some supplies….
Supplies List: Today you will be needing…
- Watercolor Paper
- Watercolor Paints: The colors I will be using today include…
- Payne’s Gray, Green Gold, Cadmium Orange, Sepia, Burnt Sienna, and Permanent Carmine
- Liquitex Gold Ink
- Salt
- Watercolor Brushes: sizes 10, 6, 4, and 0
- Cheap brush for Ink
- Water
- Palette: I will be using a white glass plate and explain why later.

Step 01: Experiment with Your Colors
The very first thing you want to do, is play around with your paints on a scrap piece of paper. I will be creating a color mixing chart but you can just play around with mixing colors as you wish. The goal is to find 3 to 6 colors that mix well together – avoiding muddy color schemes. Since we will be working a lot of wet into wet (and thus have very little control over our paints – it is important to know ahead of time that your paints work well with one another.

Step 02: Setting Up Your Palette
This next step may seem a bit trivial, but trust me it will help you in the long run. First, if you haven’t already done so place your paints on your plate. By using the paint directly from the tube, we are guaranteed bright vibrant colors. However, these colors can be a bit to intense. Thus, I recommend creating small puddles of watered down colors just in front of your globs of paint. By setting your palette up like this ahead of time – you won’t have to worry about mixing colors or watering down colors while painting.

Step 03: Paint Away
Start with your largest brush and begin at the tip of your leaf. As you are painting, create a flat wash along one section of the leaf (in between the veins of the leaf), once you like your progress, pick up another color from your palette and add it on the dry paper directly next to your wet paint. The two colors will merge together creating a nice gradient between the two. I recommend starting with warm colors and slowly moving toward cooler colors in regions you wish to show decay.
Step 04: Adding Texture
I was planning on trying 3 types of watercolor texture for this leaf, but decided midway through to just do two: salt and gold ink.
SALT:
Salt is one of those textures watercolor is known for. But I caution you from using too much. For these leaves, less will be more. Once your paint hits that magical glimmering moment where your paint is neither too wet and too dry – add a bit of salt. The salt should take on the color of the paint around it soaking in the excess water.
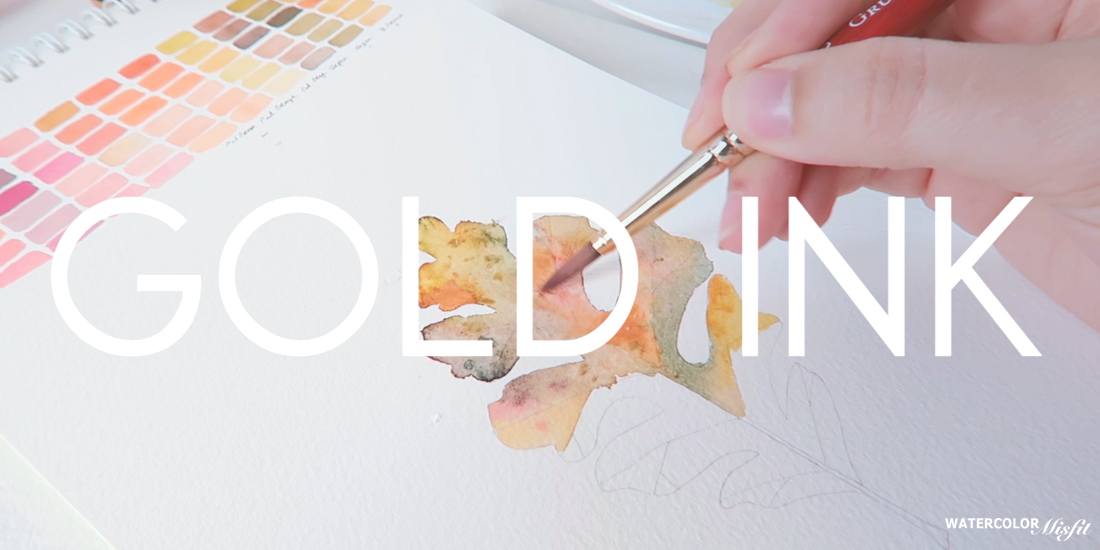
LIQUID GOLD:
Finally, let’s add some elements of gold to your leaf. I absolutely love using gold as an added texture to my leaves. The reason is because this particular ink can easily be used to cover up unwanted “mistakes” in our leaf or added little bits of emphasis to regions you really admire. I like to add gold with a cheap brush to the edges of my leaf to emphasis decay and usually to the center regions where my colors may not have mixed well. Make sure to dab the color down and then spread it out just slightly on the edges to create a gradient effect. This ink won’t expand out like your watercolor paints – rather it likes to stay put where ever you place it. However, the gold is so brilliant and opaque is nature it adds a nice pop to your leaf as it dries.
Once you have painted your entire leaf, make sure completely leave it alone to dry. Before we add our final details your paper MUST and I repeat MUST be completely dry.

Step 05: Final Details
Probably thought we were done didn’t you? Well, not quite yet there are three more things I recommend adding to your leaf before we are officially finished.
POLKA DOTS:
Yep, you heard me right – Polka Dots. Like I said earlier, I wanted to add a bit of whimsy to these leaves and make them appear realistic with an added element of imagination. Polka dots seemed like a natural choice to give that ended element of decay yet not over power the leaf. I recommend adding them in varying sizes, in random places anywhere you feel may translate decay on your leaf. Make sure to mix up a neutral watered down gray brown tone. These polka dots are meant to be glazed over you’re previously painted colors not appear like opaque glass of paint on top of your leaf. These technique will create the decaying natural appearance of your leaf. Now, since we painted the colors wet in wet earlier – your leaf most likely will look completely different from mine. So I recommend analyzing the color gradients and transitions of your leaf. If there is an area that has too much one color or a transition that just went bad – add a polka dot there to break up the color and add purposeful emphasis. I also like to add half circles to the edges as well. Make sure to not add to many dots or else the decaying look will be lost. Always remember less is usually more when painting with watercolor.
STEM AND VEINS:
Now to add the remaining details. After your polka dots have completely dried. Using your gray brown watered down mixture, with your small liner brush lightly trace over your vines and stems to make them pop.
3D SHADOW:
Last but not least, taking a watered down version of your Payne’s Gray, add a shadow to the left edge of your leaf as well as the bottom each individual section. This will make your leaf almost look as if it is popping off your paper.
And that is it! A Whimsical Autumn Leaf to display in your house or show off to your friends.


No Comments